
Have you ever thought that you want to start dealing with IoT, but you do not know how? If so, this article is for you!
First, let me tell you, how the idea for today’s article came about. One day, a fellow student of mine called me and said he wanted to build a smart system, but he did not know where to start and what to buy for it. So, I saw that this topic is probably interesting.
So, these are the things that you must have to start an IoT system:
Must Haves
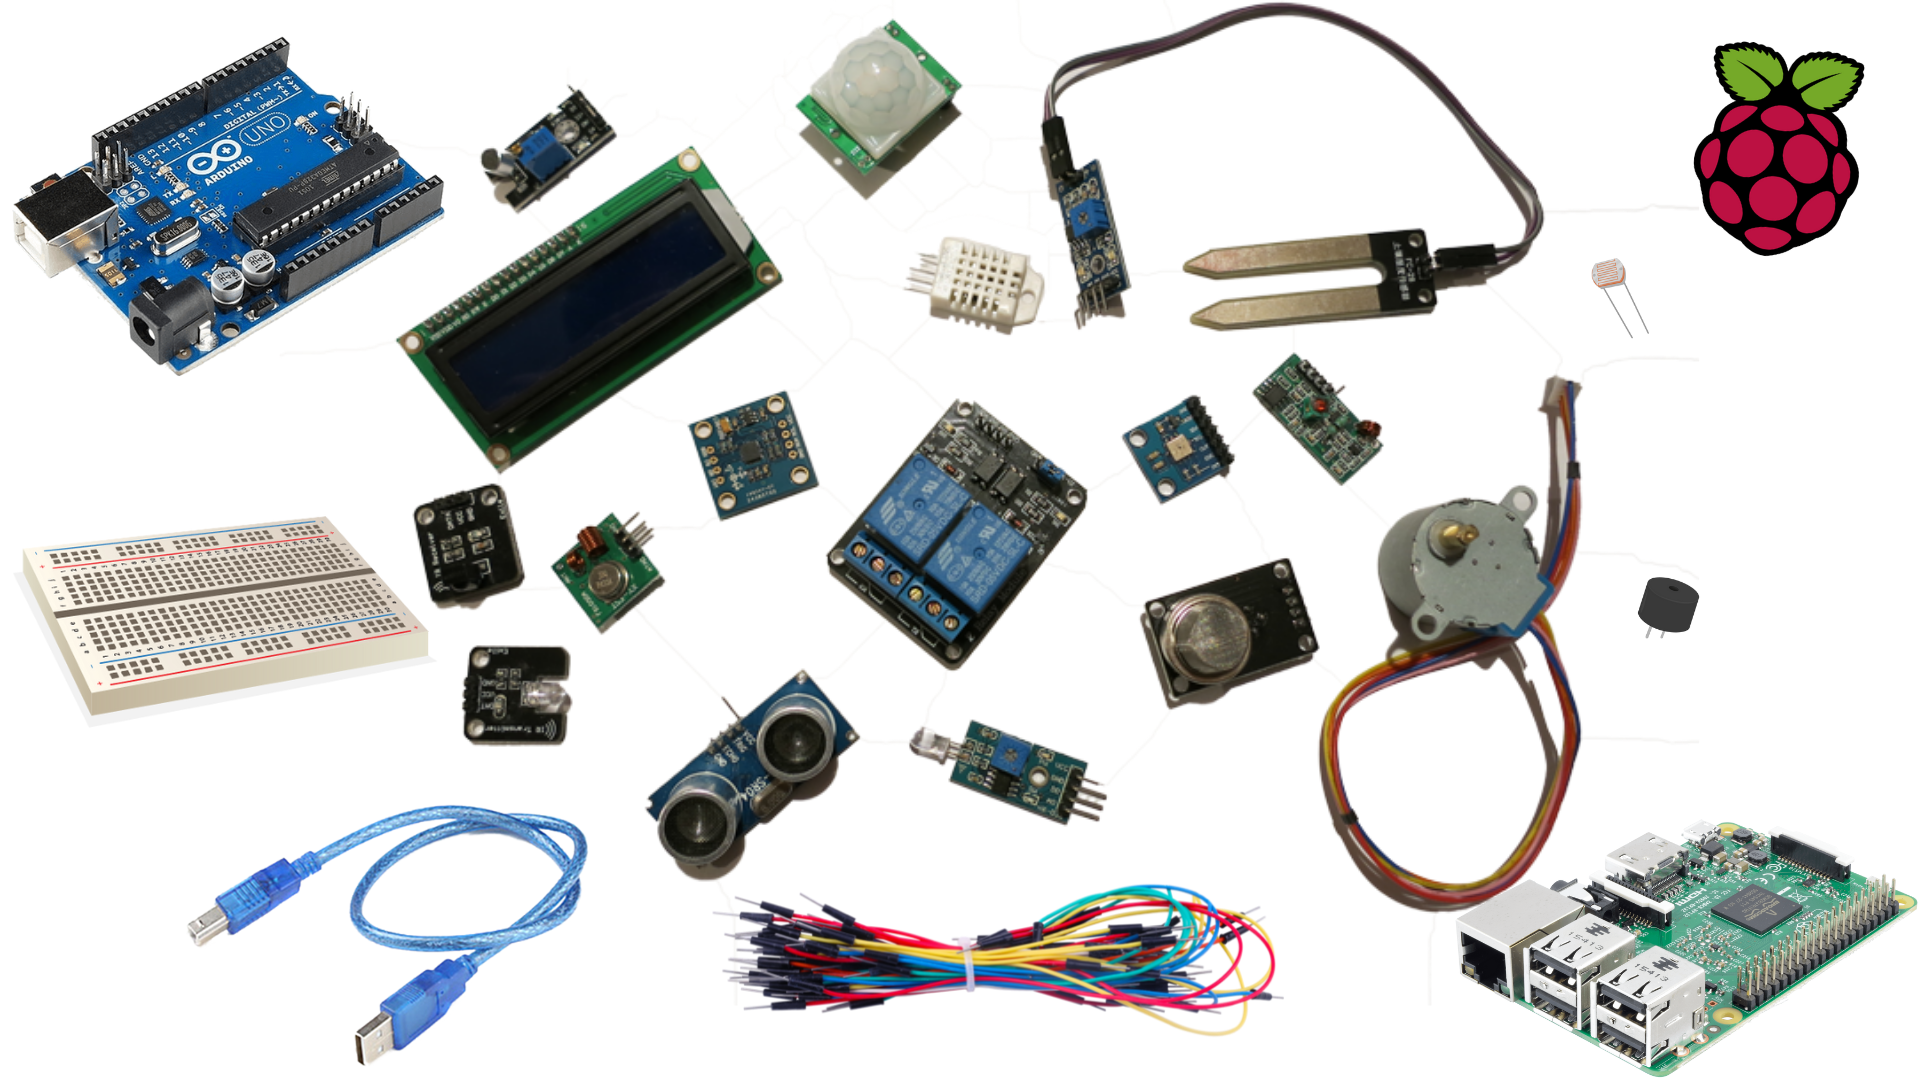
Microcontroller / Printed circuit board
Sensors
Breadboard && cables
Basic knowledge of electronics
Basic knowledge of programming
Wi-Fi connectivity
Gateway
Server
Let’s go see them in more detail.
- Microcontroller
A microcontroller is a small computer on a single metal-oxide-semiconductor that contains CPUs and programmable input/output peripherals. - Printed circuit board (PCB)
Nowadays, we use for our IoT systems PCBs – Printed Circuit Boards, like Arduino, to processing all the information by sensors etc.
For someone who just started with IoT, I suggest using the Arduino, because it is a cheap solution and has a very good community that is very helpful.

- Arduino is an open-source electronic design platform based on flexible and easy-to-use hardware and software. There are several types of Arduino, but a good choice is the Arduino UNO. Arduino’s microprocessor gives us a number of gates that can be used either as inputs or as outputs in our circuits. The Arduino UNO, as you can see, has 14 digital input/output ports and six analog input pins. The 14 digital ports are named with numbers from 0 to 13, while the six analog ones with the letter A followed by a number from 0 to 5. At the output, the pins can give 0 up to 5V voltage. Of the 14 digital ports, six, and in particular the 3, 5, 6, 9, 10, 11, are also PWM ports (Pulse Width Modulation), which means that they can simulate analog outputs. And finally, the code of Arduino is C-like.
In order to choose the right PCB for you, you have to think about how much space it should take, how many peripherals it should have etc. - Sensors
Of course, you also need sensors for detecting or measuring a physical property. - Breadboard and Cables
You need breadboard and cables to connect the elements. Those two, are so important, but we often forget to put them on our shopping list. Breadboard is helpful for the construction of temporary circuits and do not require any welding.
How to use it:
Aside from horizontal rows, breadboards usually have what are called power rails that run vertically along the sides. Usually, they will be labeled with a ‘+’ and a ‘-’ and have a red and blue or black stripe, to indicate the positive and negative side. When you put a cable in a hole and another one in a hole with the same number, it is like you put these cables together.

- Basic knowledge of electronics, like how breadboard works, how electronics work etc.
- Basic knowledge of programming
- Wi-Fi connectivity
And of course, you need an Internet connection to send the information to the Internet.
On PCBs that don’t have a built-in Wi-Fi chip, as Arduino, you have to put an extra microcontroller for Wi-Fi connectivity. - Gateway
You will also need, a gateway, as Raspberry Pi, which receives the data from all the boards and upload it to the server. The Raspberry Pi is a low cost, credit-card sized computer that plugs into a computer monitor or TV, and uses keyboard and mouse. Raspberry has, also, a very good community that is very helpful, especially for someone who just started.
- Server
You need a server that accepts all your data. For security reasons, I use Microsoft Azure. Microsoft Azure has the advantage of multi-layered security across physical data centers, infrastructure, and operations in Azure. With this you can rely on a cloud that is built with customized hardware, has security controls integrated into the hardware and firmware components, and added protections against threats. The main services are:- Azure IoT Hub
- IoT Central
- Azure Sphere
How it works
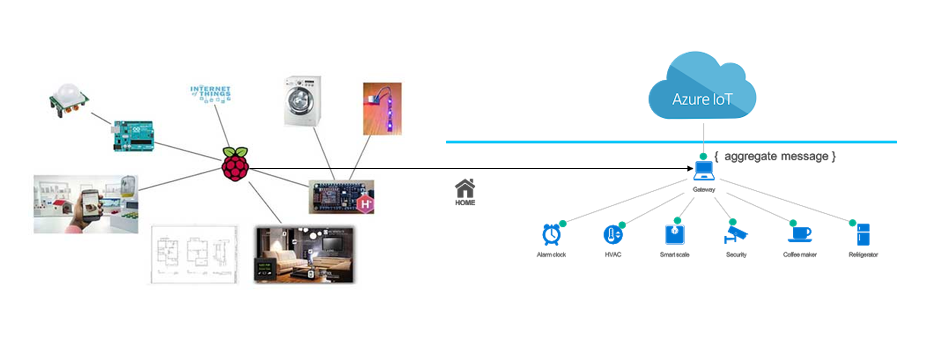
As you can see in the picture, sensors detect a physical property and send it to microcontrollers. Then microcontrollers send this data to the gateway. And finally, the gateway sends the data to the cloud. Thus, we can inform about this data from our mobiles, for example.
Shopping List
PCB (like Arduino)
Sensors
Breadboard
Cables
Electronic components (like resistors, transistors, capacitors, inductors, and diodes)
IDE
Wi-Fi module (like ESP8266)
Gateway (like Raspberry Pi)
Server license (like Microsoft Azure)
Have a great shopping time!
Simulators – Emulators
If you can’t buy all these things, don’t worry! I have you a solution! There are many simulators and emulators on the Internet, so, you can use many PCBs, even if you haven’t any of them. This solution is also useful for distance education. I have my favorites here:
https://www.tinkercad.com/
https://azure-samples.github.io/raspberry-pi-web-simulator/
https://wokwi.com/
https://fritzing.org/
https://www.microsoft.com/en-us/makecode
Resources
Final, here are some very helpful websites:
https://www.arduino.cc/
https://www.raspberrypi.org/
https://docs.microsoft.com/
https://developer.microsoft.com/en-us/offers/30-days-to-learn-it/?ocid=AID3031751
https://www.adafruit.com/
https://www.instructables.com/
https://www.sparkfun.com/
My favorite IoT blogs
https://www.petecodes.co.uk/
https://jonnychipz.com/
https://www.cliffordagius.co.uk/
https://thinkaboutiot.com/ 😛
I hope this article helped you!
Have a wonderful time making IoT systems!

This blog useful for me. I definitely try to build my own loT system
I am glad about that!
Thank you very much!